生成提供给HTTPS的CA证书(如果已经持有CA证书可以忽略这一步)
1).安装openssl Centos下:yum install openssl
.创建服务器私钥并且输入你的密码
Openssl genrsa -des3 -out server.key 1024 
.创建签名请求证书(rsa)
openssl req -new -key server.key -out server.csr 在此处输入刚刚设置的私钥密码:  设置你所在机构或者个人的信息:
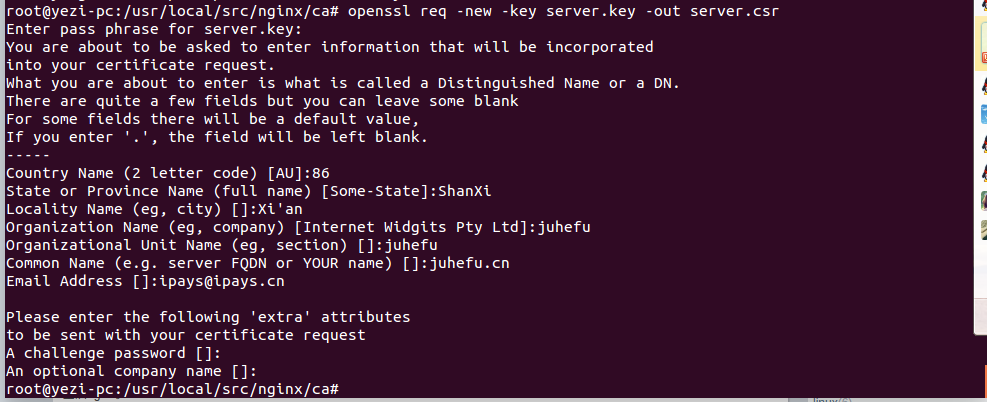
.对上述私钥出去密钥输入信息以提供给Ngnix使用(一般也提供给证书颁发机构)
cp server.key server.key.passwd openssl rsa -in server.key.passwd -out server.key 
.生成Ngnix需要的密钥
openssl x509 -req -days 365 -in server.csr -signkey server.key -out server.crt  注意:完成后,你应该有以下几个文件 server.crt server.csr server.key server.key.passwd 其中,server.crt是我们需要的
配置ngnix以支持https
下载ngnix
cd /usr/local/src/ 输入: wget http://nginx.org/download/nginx-1.9.5.tar.gz
解压下载文件:
tar -zxvf ngnix-1.9.5.tar.gz mv ngnix-1.9.5 ngnix 3)配置编译环境 yum install gcc g++ yum install make automake autoconf libtool 4)安装PCRE wget ftp://ftp.csx.cam.ac.uk/pub/software/programming/pcre/pcre-8.37.tar.gz tar -zxvf pcre-8.34.tar.gz
配置并且安装ngnix
a.搭建编译环境: yum install gcc g++ yum install make automake autoconf libtool b.安装PCA库: wget ftp://ftp.csx.cam.ac.uk/pub/software/programming/pcre/pcre-8.39.tar.gz tar –zxvf pcre-8.39.tar.gz cd pcre-8.39 /configure make make install c.安装zlib库: cd /usr/local/src wget http://zlib.net/zlib-1.2.11.tar.gz tar –zxvf zlib-1.2.11.tar.gz cd zlib-1.2.11/ ./configure make make install D. 添加openssl源码 wget ftp://ftp.openssl.org/source/openssl-1.0.2k.tar.gz tar -zxvf openssl-1.0.2k.tar.gz E. git安装 yum install git yum install -y zlib-devel F. 下载准备nginx lua模块 # cd /usr/local/src wget http://luajit.org/download/LuaJIT-2.0.3.tar.gz tar -zxvf LuaJIT-2.0.3.tar.gz cd LuaJIT-2.0.3 export LUAJIT_LIB=/usr/local/lib #这个很有可能不一样 export LUAJIT_INC=/usr/local/include/luajit-2.0 #这个很有可能不一样 make make install wget https://github.com/simpl/ngx_devel_kit/archive/v0.2.19.tar.gz tar -zxvf v0.2.19.tar.gz mv ngx_devel_kit-0.2.19/ ngx_devel_kit cd ngx_devel_kit/ git clone https://github.com/openresty/lua-nginx-module.git 提示: /usr/local/nginx/nginx: error while loading shared libraries: libluajit-5.1.so.2: cannot open shared object file: No such file or directory echo "/usr/local/lib" > /etc/ld.so.conf.d/usr_local_lib.conf ldconfig /usr/local/nginx/sbin/nginx -t nginx: the configuration file /usr/local/nginx/conf/nginx.conf syntax is ok nginx: configuration file /usr/local/nginx/conf/nginx.conf test is successful /usr/local/nginx/sbin/nginx --with-zlib=/usr/src/zlib-1.2.8 \ ./configure --sbin-path=/usr/local/nginx/nginx \ --conf-path=/usr/local/nginx/nginx.conf \ --pid-path=/usr/local/nginx/nginx.pid \ --with-http_ssl_module \ --with-http_stub_status_module \ --with-pcre=/usr/src/pcre-8.37 \ --with-openssl=/usr/src/openssl-1.0.1g \ --add-module=/usr/src/ngx_devel_kit \ --add-module=/usr/src/lua-nginx-module \ --user=root \ --group=root \ --without-http_charset_module \ --without-http_uwsgi_module e.安装ngnix cd /usr/local/src wget http://nginx.org/download/nginx-1.4.2.tar.gz tar -zxvf ngnix-1.4.2.tar.gz cd ngnix-1.4.2 ./configure --sbin-path=/usr/local/nginx/nginx #编译sbin生成路径 --conf-path=/usr/local/nginx/nginx.conf #ngnix.conf配置文件路径 --pid-path=/usr/local/nginx/nginx.pid #运行pid保存路径 --with-http_ssl_module #HTTPS支持模块 --with-http_stub_status_module #http模块 --with-pcre=/usr/local/src/pcre-8.37 #已经编译的pcre库路径 --with-zlib=/usr/local/src/zlib-1.2.8 #已经编译的zlib库路径 --with-openssl=/usr/local/src/openssl-1.0.2c #已经编译的openssl路径 -user=www --group=www #所属用户和组  make #编译源码 编译成功后,结果如下:
  make install #安装 安装成功后结果如下:
  进入完成目录: cd /usr/local/ngnix
  4) 配置ngnix A.配置ngnix.conf文件 cp ngnix.conf ngnix.conf.bak #备份默认配置文件 在http包下添加以下内容: server { server_name localhost; #域名 listen 443; #监听端口 ssl on; #是否进行HTTPS转发 ssl_certificate /usr/local/nginx/conf/server.crt; #HTTPS证书 ssl_certificate_key /usr/local/nginx/conf/server.key; #HTTP密钥 } 验证结果: /usr/local/ngnix/ngnix
  https://127.0.0.1
 5)重写HTTP到HTTPS的方案 a>使用ngnix的rewite方案 打开配置文件,并且添加以下内容到HTTP包内: listen 443; listen 80; server_name lingye.com; ssl on; ssl_certificate /usr/local/ca/server.crt; ssl_certificate_key /usr/local/ca/server.key; error_page 497 https://$host$uri; 测试配置: /usr/local/ngnix|ngnix -s reload 浏览器输入:http://127.0.0.1/会自动跳转到https页面 b>和ngnix配合使用页面跳转(百度正在使用) 添加静态跳转页面,如index.html 页面添加代码: <html> <meta http-equiv="refresh" content="0;url=http://www.baidu.com/"> </html> ngnix文件配置: server { listen 127.0.0.1:80; server_name test.com; location / { #index.html放在虚拟主机监听的根目录下 root /srv/www/http.test.com/; } #将404的页面重定向到https的首页 error_page 404 https://test.com/; } c>利用ngnix的error页面进行强制性HTTPS跳转 Ngnix.conf配置如下 server { listen 127.0.0.1:443; #ssl端口 listen 127.0.0.1:80; #用户习惯用http访问,加上80,后面通过497状 态码让它自动跳到443端口 server_name test.com; #为一个server{......}开启ssl支持 ssl on; #指定PEM格式的证书文件 ssl_certificate /etc/nginx/test.pem; #指定PEM格式的私钥文件 ssl_certificate_key /etc/nginx/test.key; #让http请求重定向到https请求 error_page 497 https://$host$uri?$args; } 个人觉得:对于HTTPS现在不论个人网站还是企业网站需要的地方都比较多,国内目前腾讯云又推出免费一年的SSL证书,自亚洲诚信颁发,到期后可以续费。也有别人推荐过Let's Encypt,不过有一定的限制